
Carmen Mobile Integration Manual
Document version: 2021.12.15
About Carmen Mobile & Carmen Cloud
Brief Description
Carmen Mobile is an app running on Android Devices. It is capable to record events from passing vehicles based on vehicle detection and Carmen Cloud ANPR. An event consists of an image and metadata like the full ANPR result, the event time and location.
System Architecture & Basic Logic
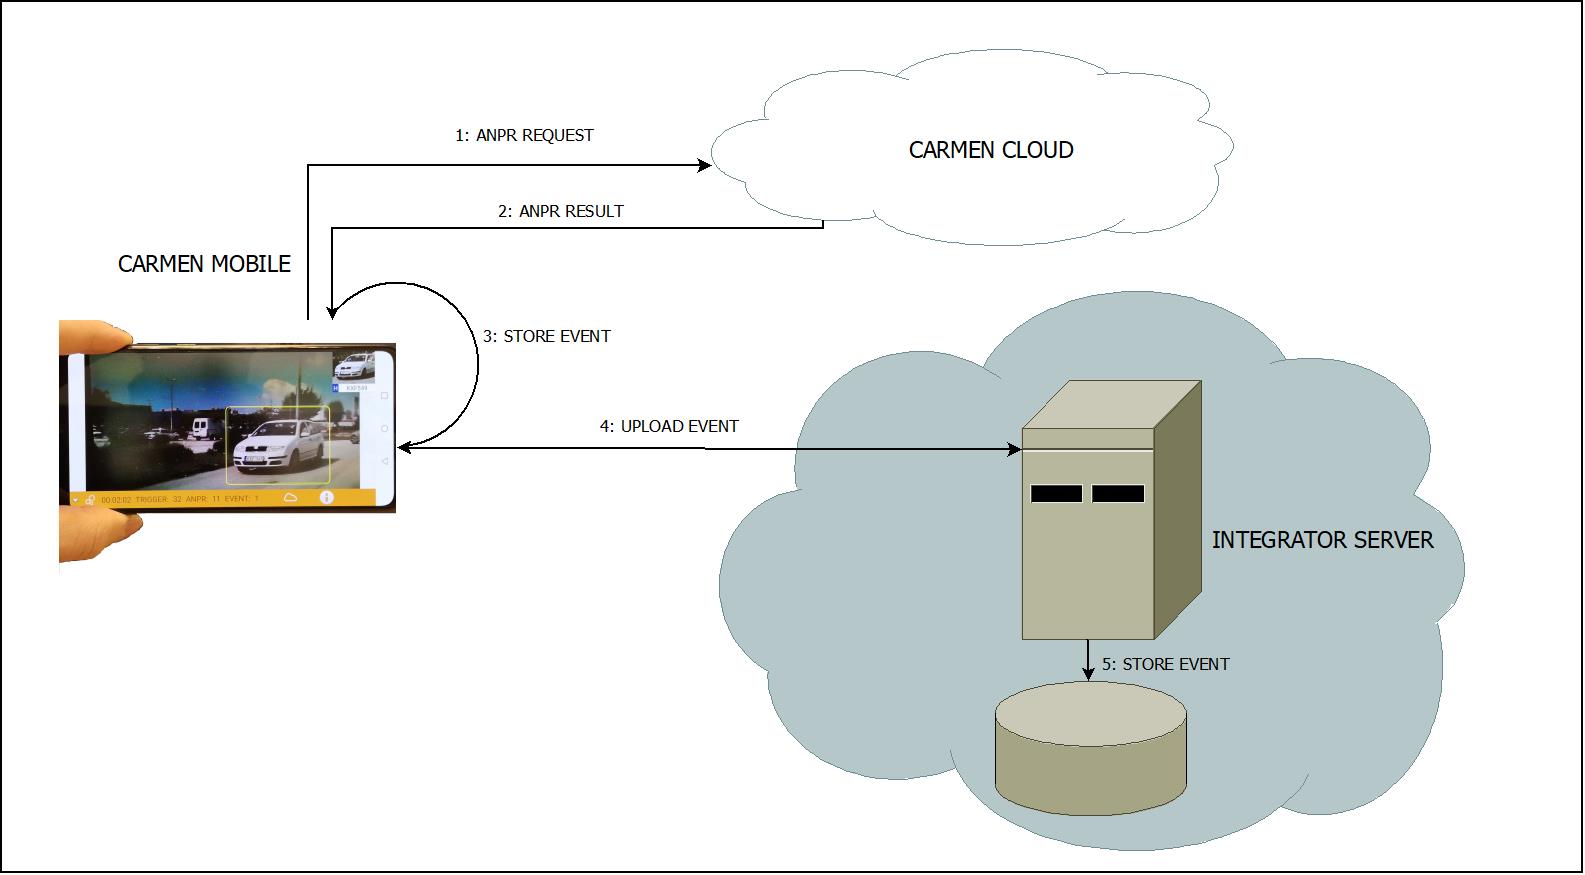
From integration point of view, the basic logic is the following:
- Based on an automatic or manual trigger, an image with a detected vehicle is sent to the Carmen Cloud.
- The Cloud service reads the plate with the Carmen engine, and send the result to the Android device.
- The device stores an event in its local database. (Image & metadata)
- If uploading function is enabled, the device uploads the event to the Integrators system.
- The integrator can store and process the event.
Hotlists overview
There are three supported methods of hotlist handling.
- You can manually add the plates in the applications’ settings.
- You can set up a server which can communicate with the app.
- You can download a csv from a weblink. This can be generated by a back-office system.
After storing the event, the hotlist check is activated. The app checks its local database for a matching plate and it also uploads the plate to a configured Hotlist server. In a matching case, the app generates an alert. Two types of alert can be generated, deny and allow. When allow alert occurred, the corresponding plate color turns into green. In case of denylisted events, a warning sound is indicating, and a visual alert is created, with the image of the corresponding wehicle, and a blinking background.
This is the modified logic using a Hotlist server:
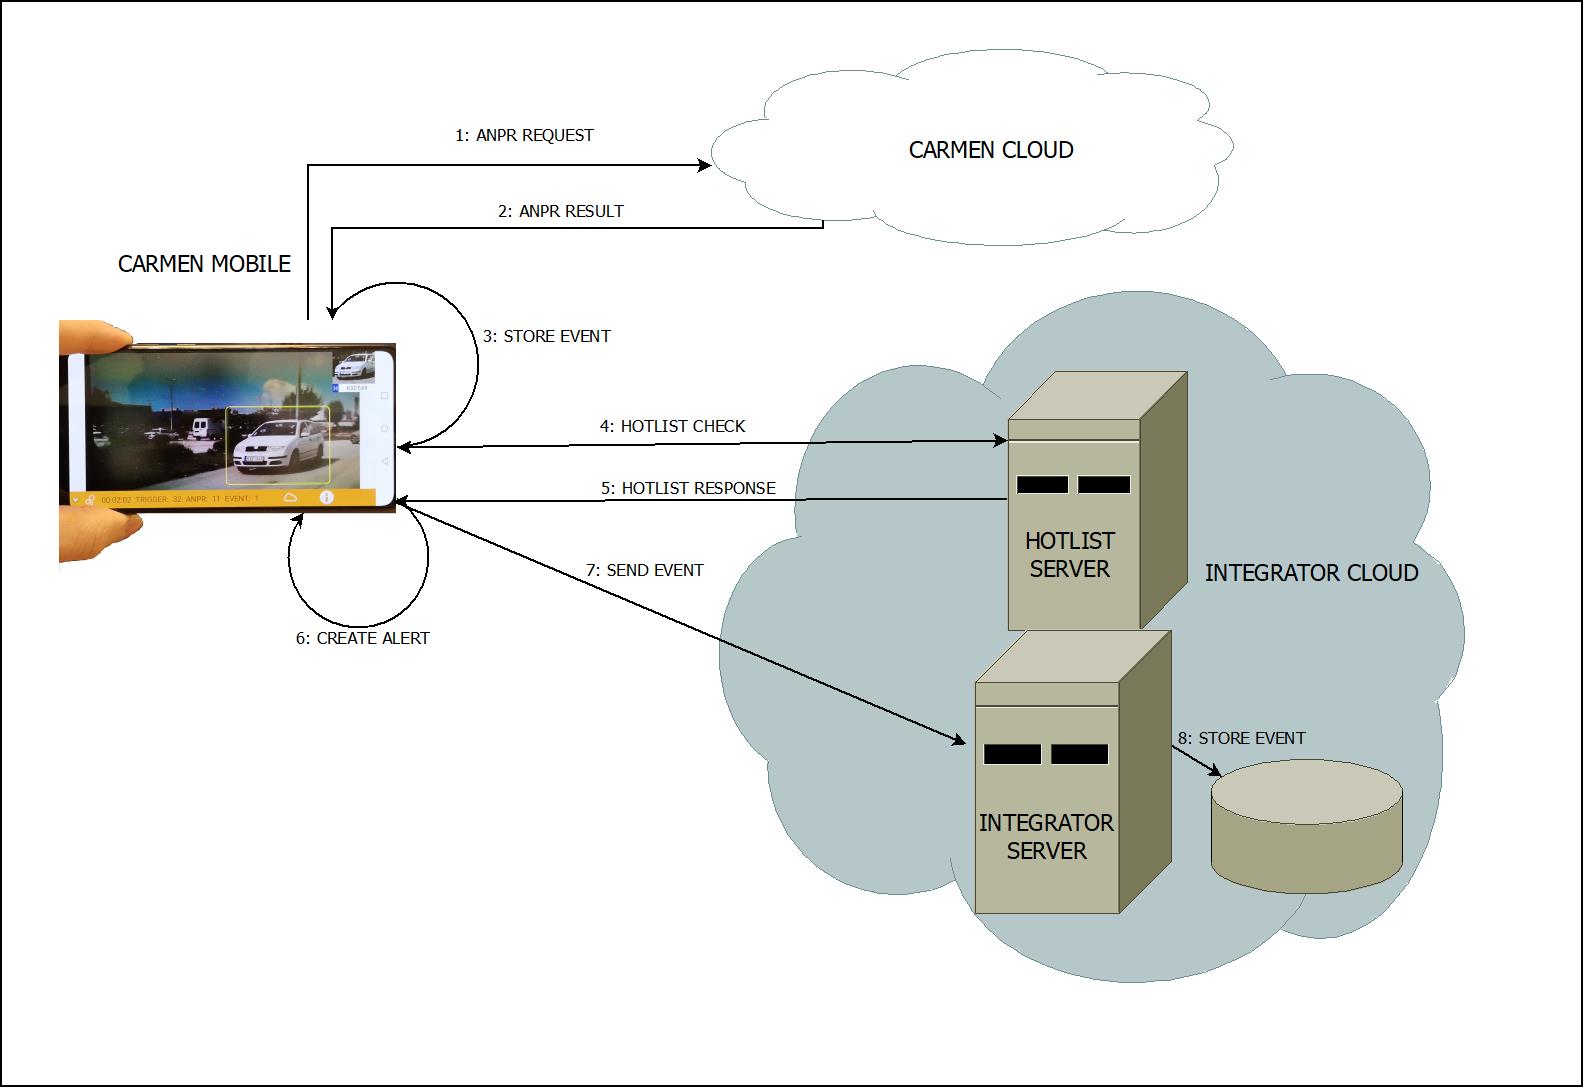
Use Hotlist settings only if you need alert on your Carmen Mobile device, otherwise upload settings are recommended.
Integration
Upload
There are multiple ways of uploading the events. In all cases you have to save a valid URL in the settings tab’s upload path. You can scan the URL from a QR code as well. You have to enter the path of the server, and you can scan the generated QR code with the app. Go to /SETTINGS/Integration/Event upload/upload path and click ont he QR code for fast setup.
Here are some online QR-code generators.
You can select what kind of media you want to upload, in the upload settings.
On-the-fly Upload
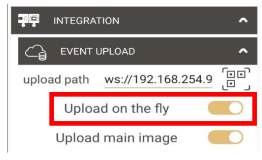
By selecting “Upload on the fly” option, the application will upload the events immediately after recording them. This is not a recommended feature unless you have a strong 4g connection.
Uploading To GDS
The App can upload the events to GLOBESSEY® DATA SERVER – GDS. For this option you have to fill the “upload path” in the settings/integration/event upload, with a valid GDS address.
The valid format of the address follows this example:
ws://192.168.254.98:8889/gate
When you successfully registered your application to the GDS server, the GDS administrator has to approve your registration. Uploading events to GDS is possible only after approval!
It is recommended to upload your data after finishing the measurement preferably on Wi-Fi connection for the following reasons:
- As sending images to GDS also uses your 4g connection and it might slow down the response time of the cloud service and it may cause some timeouts when driving in low 4g gradient area.
- Uploading the overview image on 4g connection is not recommended at all, because an event can be even 2 Mb!! When connected to Wi-Fi, this is not a problem and you can show all data that is generated by the app, on the GDS.
It is not recommended to touch the phone while uploading, as it will stop the upload
HTTP POST
Giving a valid HTTP path, the app will make HTTP POST to the given path concatenated with /api/event. The app generates a regular HTTP multipart message with the following content:
| field | description | type | example |
|---|---|---|---|
data | Event JSON | string | {Event JSON…} |
image | Binary JPG image of the vehicle | binary JPG | binary data |
plate_image | Binary JPG image of the plate | binary JPG | binary data |
overview_image | Binary JPG overview image | binary JPG | binary data |
video | Binary MP4 video | binary JPG | binary data |
An example of a valid path is this: http://192.168.1.50:8081
This is a short HTML that generates the same request by submitting the form:
<!DOCTYPE html>
<html>
  <body>
    <form action="http://ip:port/api/event" method="post"
    enctype="multipart/form-data">
      <label>data</label>
      <input type="text" name="id" value="{JSON content here…}" required><br>
      <label>Image</label>
      <input type="file" name="image" accept="image/bmp, image/jpeg, image/png"><br>
      <label>Plate image</label>
      <input type="file" name="plate_image" accept="image/bmp, image/jpeg, image/png"><br>
      <label>Overview image</label>
      <input type="file" name="overview_image" accept="image/bmp, image/jpeg, image/png"><br>
      <label>Video</label>
      <input type="file" name="video" accept="video/mp4"><br>
      <input type="submit" value="Submit">
    </form>
  </body>
</html>
FTP
Giving a valid FTP path, the app will upload the event to the FTP server.
An example of a valid FTP path:
ftp://user:password@192.168.43.107:21/
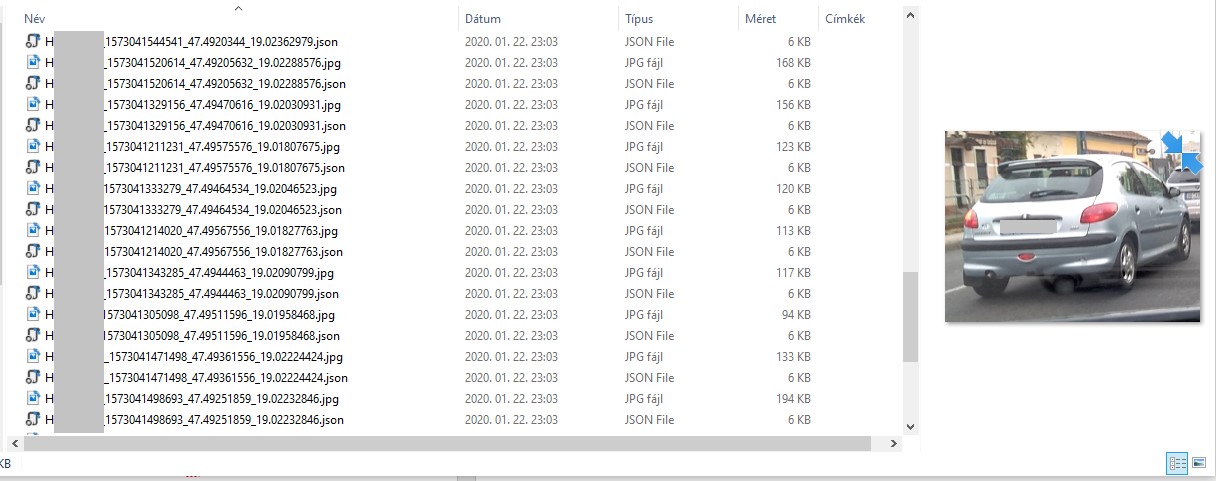
An event creates two or more files in the fileserver side. Images of the vehicle and a valid JSON file with all the metadata. The name of the files are the same, and only the extension is different (JPG, JSON). The name of the files encodes the minimal info about the corresponding event in the following format: nationality_plate_timestamp_latitude_longitude
This is an example:
H_ARH001_1573041317600_47.49485769_19.01995078.jpgH_ARH001_1573041317600_47.49485769_19.01995078.json
This is an example result of an upload:
Hotlists
Besides storing your hotlists on the device, it is possible to setup a server. The app can send the ANPR results to this server, and receive the hotlist info from the server. In case of a denylisted vehicle, the device makes an alert (visual + sound).
Hotlist server protocol
Request
The android device sends a HTTP POST message to the given url +
/api/bwlist path. The app generates a regular HTTP multipart message
with the following fields:
nationality: The plate’s nationalityplate: the plate text
This is an HTML that generates the same message:
<!DOCTYPE html>
<html>
  <body>
    <form action="http://ip:port/api/bwlist" method="post" enctype="multipart/form-data">
      <label>Plate</label>
      <input type="text" name="plate" value="ARH001"><br>
      <label>Nat</label>
      <input type="text" name="nationality" value="HUN"><br>
      <input type="submit" value="Submit">
    </form>
  </body>
</html>
Result
For such a request, the server responds with a JSON text. Currently it
has only one field: type. The value can be deny, allow or none
(lowercase). An example of such a result is the following:
{
  "type": "deny"
}
Hotlists from web url
You can setup your hotlists using a web url. The app makes a HTTP GET
call to the given link. It expects to reach a CSV file with the
following format: nationality;plate;type
This file can be generated by a back-office system. Nationality shall be in ISO3 format.
Here is an example of a valid CSV
HUN;KRV914;deny
HUN;MNC878;allow
HUN;PMS314;allow
HUN;NPV421;deny
HUN;RFR826;deny
HUN;LLC481;allow
HUN;LWC739;allow
HUN;LGK007;deny
HUN;MYK030;deny
HUN;HDH062;allow
HUN;KCH452;allow
HUN;LOL247;deny
HUN;PLG012;allow
HUN;HZH004;allow
HUN;EXY124;allow
HUN;POV865;deny
Integrating the app into your application
Brief how-to
If you have an installed Carmen Mobile app on your device, you can embed it into your application. You can start video processing from your application, and pass the desired settings. The settings are passed as a JSON string. An example of such a JSON is the following:
{
  "startVideo": true,
  "receiverClass": "com.ar.carmenintegration.CarmenResultReceiver",
  "mode": "InMotion"
}
Start video processing with the following code in Android:
private void startVideoProcessing() {
  JSONObject settings = new JSONObject();

  try {
    settings.put("startVideo", true);
    settings.put("mode", "InMotion");
    settings.put("receiverClass", "com.ar.carmenintegration.CarmenResultReceiver");
  } catch (JSONException e) {
    e.printStackTrace();
  }

  Intent launchIntent = getPackageManager().getLaunchIntentForPackage("com.arh.anprclientwithopencv");

  if (launchIntent != null) {
    launchIntent.putExtra("settings", settings.toString());
    startActivity(launchIntent);
  }
}
You can pass the following modes: InMotion, InFixPosition, Parking,
InHand, Motorway, Custom.
After starting the app, you have to wait for establishing connection
with the cloud. The video processing will be started automatically. The
app will send events as Boradcast messages to your caller activity’s
receiverClass in JSON format.
You will have to create a Broadcast receiver class in your application to receive the events.
Here you can find the details how to create one: https://developer.android.com/guide/components/broadcasts
Broadcast Receiver Example
Code
import android.content.BroadcastReceiver;
import android.content.Context;
import android.content.Intent;
import android.os.AsyncTask;

public class CarmenResultReceiver extends BroadcastReceiver {
  public CarmenResultReceiver() {
  }

  @Override
  public void onReceive(Context context, Intent intent) {
    final PendingResult pendingResult = goAsync();
    Task asyncTask = new Task(pendingResult, intent,context);
    asyncTask.execute();
  }

  private static class Task extends AsyncTask<String, Integer, String> {
    private final PendingResult pendingResult;
    private final Intent intent;
    private final Context context;

    private Task(PendingResult pendingResult, Intent intent, Context
    context) {
      this.pendingResult = pendingResult;
      this.intent = intent;
      this.context = context;
    }

    @Override
    protected String doInBackground(String... strings) {
      if (intent.getAction() != null)
      {
        String json = intent.getStringExtra(handler.getExtra());
        if (json != null)
        {
          // do whatever you want with your anpr result.
        }
      }
      return "";
    }

    @Override
    protected void onPostExecute(String s) {
      super.onPostExecute(s);
      pendingResult.finish();
    }
  }
}
Other important codes & settings
Set up the Manifest file
Add your receiver class
<receiver
  android:name="com.ar.carmenintegration.CarmenResultReceiver"
  android:exported="true"
  android:enabled="true">
  <intent-filter>
    <action android:name="com.arh.anprclientwithopencv.EVENT" />
    <action android:name="com.arh.anprclientwithopencv.RESULT" />
  </intent-filter>
</receiver>
Add this line in the application tag to be able to access the images as well.
android:requestLegacyExternalStorage="true"
Request the following permissions to get read and write access:
<uses-permission android:name="android.permission.WRITE_EXTERNAL_STORAGE" />
<uses-permission android:name="android.permission.READ_EXTERNAL_STORAGE" />
Anpr Service
When Carmen Mobile is installed on your phone, an anpr service is listening in the background. If your apiKey is set properly and you have access to the Internet, other apps can send images for automatic recognition to CarmenMobile. It will forward the request to the cloud and sends the result to a Broadcast receiver class.
This is a short example of how it is possible to pass an image for automatic recognition.
private void sendBroadcast(String path)
{
  Intent intent = new Intent();

  intent.setAction("READ");
  intent.putExtra("imagePath", path); // path to the image you want to anpr.
  intent.putExtra("id", "your unique id");
  intent.putExtra("receiverClass", "com.ar.carmenintegration.CarmenResultReceiver");
  intent.addFlags(Intent.*FLAG_INCLUDE_STOPPED_PACKAGES*);
  intent.addCategory(Intent.*CATEGORY_DEFAULT*);
  intent.setComponent(
    new ComponentName(
      "com.arh.anprclientwithopencv",
      "com.arh.anprclientwithopencv.AnprService"));

  context.sendBroadcast(intent);
}
Carmen Mobile will get back to you with a RESULT in the receiver class. You can find an example for a receiver in the section Broadcast Receiver Example.