
Carmen Mobile User Manual
Document version: 2022.06.01.
Quick Start Guide
After downloading and starting the application, please authorize the Carmen® Mobile application to access your camera, device location and lastly photos and media within your device (pop-ups).
Next, connect your Carmen® ANPR Cloud subscription via one of the two options displayed on the screen in order to facilitate number plate and make and model recognition processing in the cloud.
Please remove the mobile covering/protector, as the application can heat up the phone, which can definitely be an issue in the summer. You might even help with air conditioning. (When the processor is overheated the Android system automatically switches to lower processor frequency in order to cool down the device, which might cause performance issues.)
Register for Carmen® ANPR Cloud or log in
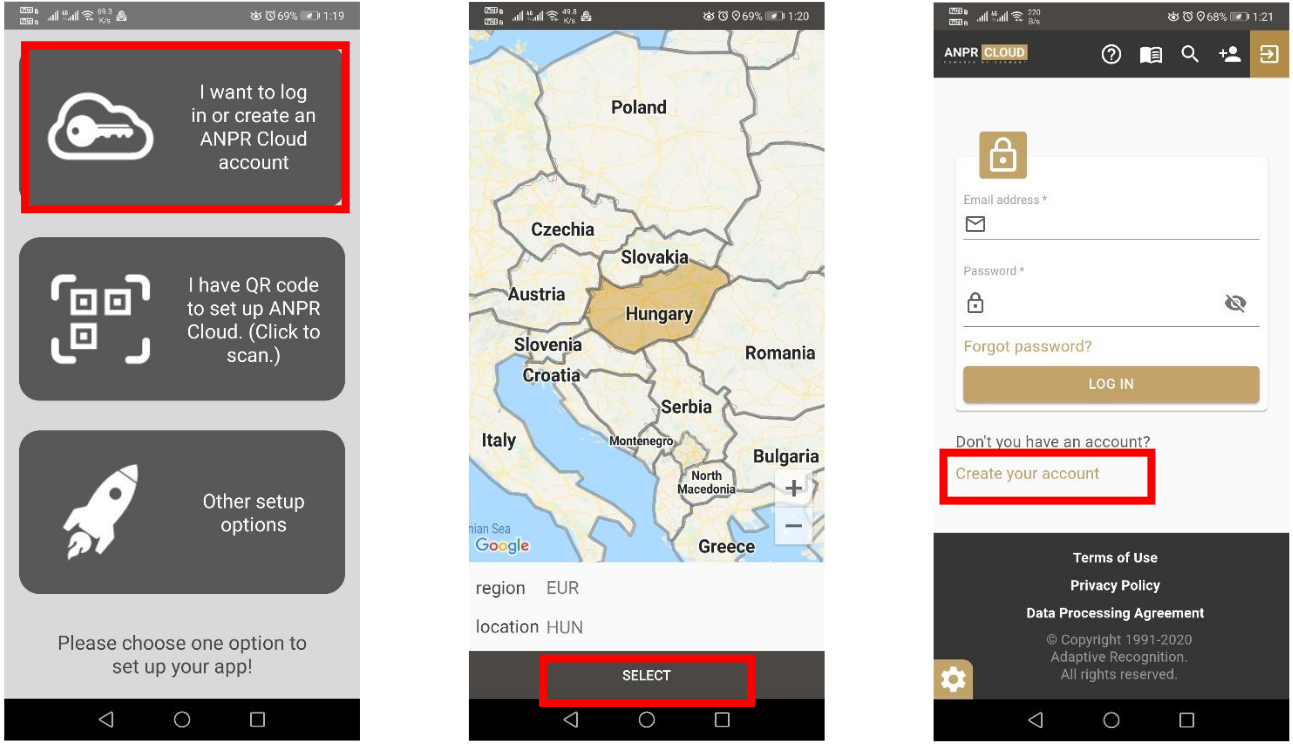
For quick login/registration please click on the first button. You will have to choose your location and click “SELECT” on the bottom. You will be forwarded to the Carmen® ANPR Cloud login page, where you can log in or quickly sign up for a new account. After a successful login, the authorization apikey will be forwarded to you and you can start using your app immediately.
Scan QR code If you have an existing Carmen® ANPR Cloud subscription
- Open Carmen® ANPR Cloud webpage (https://adaptiverecognition.com/anpr-cloud/registration/#) in a separate PC and sign in.
- Go to “How-To-Use” section.
- Scroll
down to the bottom to “Carmen Mobile Android App” and choose
corresponding API and click on the QR Code Icon all the way to the
right. If Paid API is available, make sure to use it. We suggest
the (BETA) version only for developers and of course if you have
active subscription then select that API.
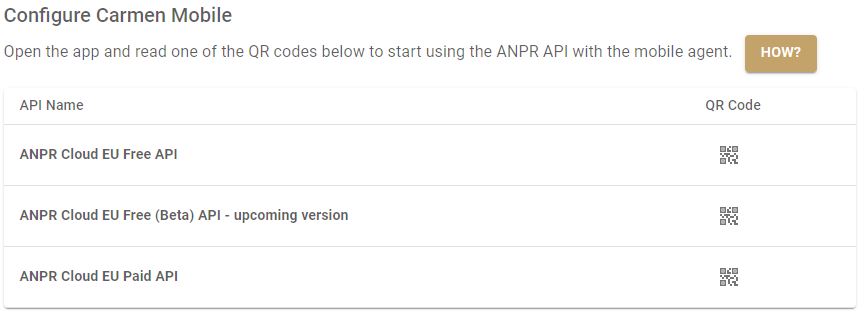
- On your Carmen® Mobile App choose “I have QR code to set up ANPR Cloud (Click to Scan)”
- Scan the QR code displayed on the monitor with your mobile device.
- Choose your Country on the interactive map.
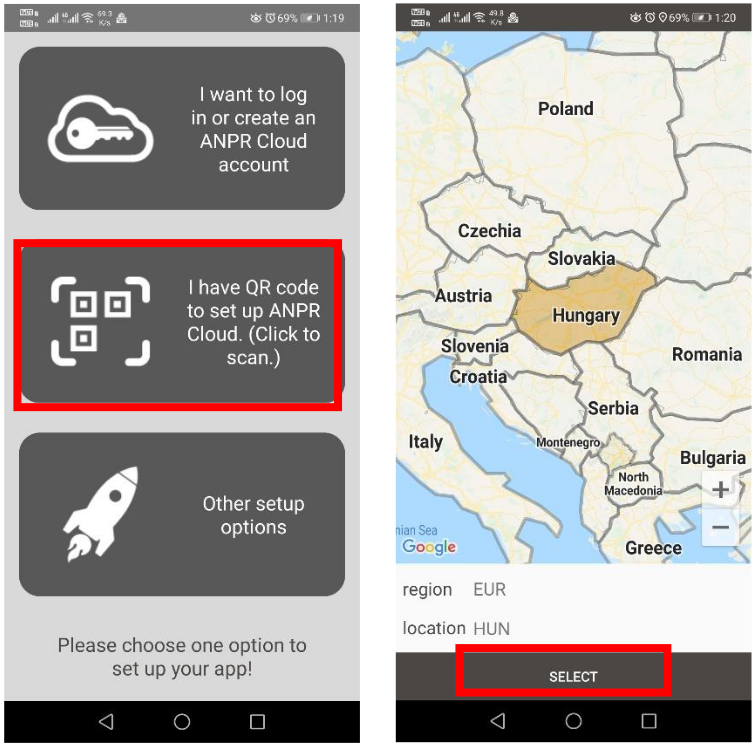
- You can start using your app immediately.
Other setup
This section includes the manuals.
Overview
When you start the application, you will enter the main activity. You can select from 3 tabs.
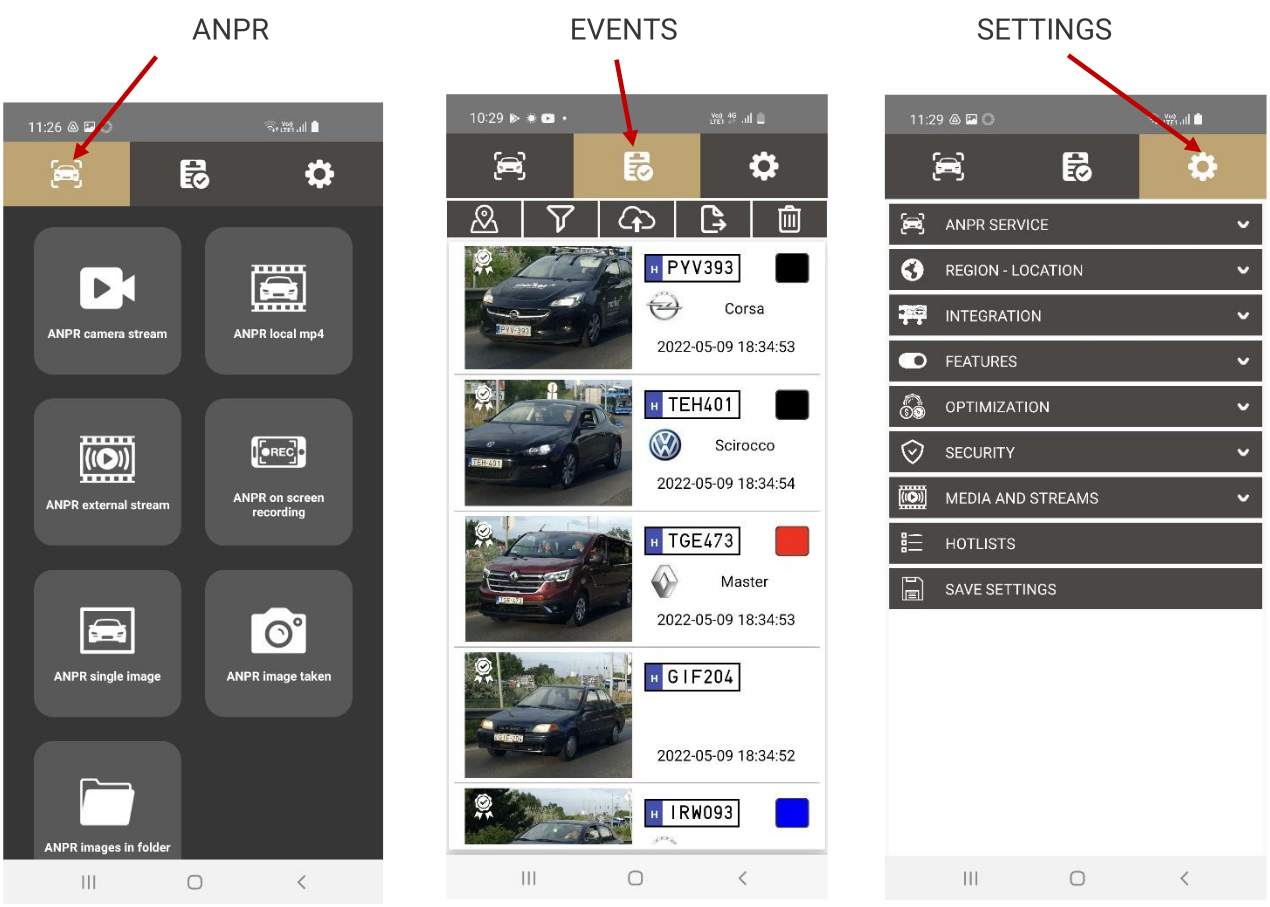
ANPR Input Selection
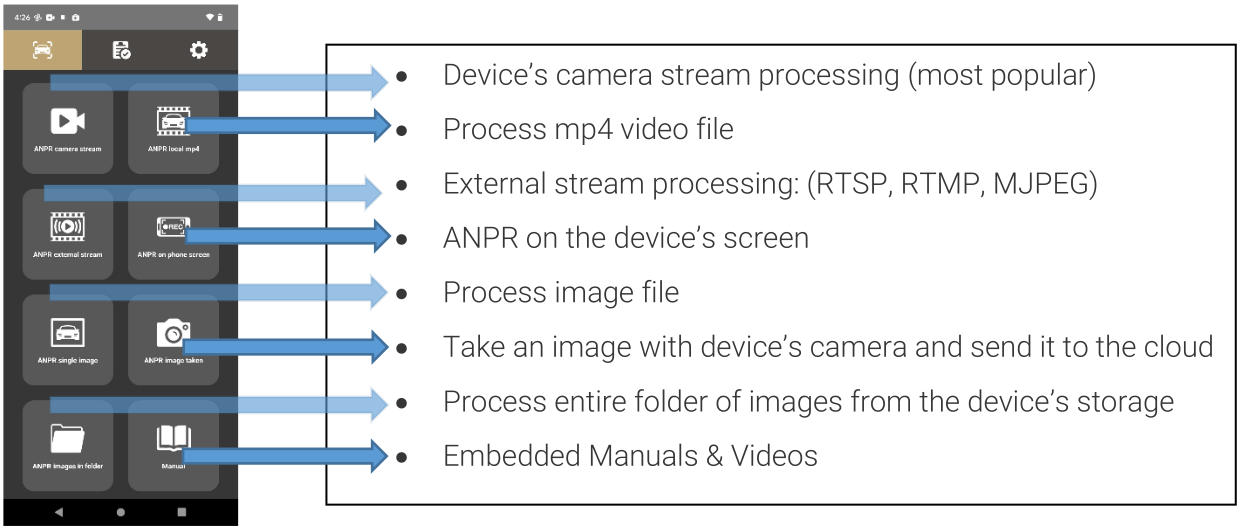
ANPR Camera Stream


Select this ANPR mode to process your device’s camera stream. This is the main feature of the application.
For best experience please use a high-end smartphone (Devices compatible with the Google Play Store; i.e. Google pixel, etc.) with a front camera scoring over 100 points on the https://www.dxomark.com/smartphones technology review site.
Modes
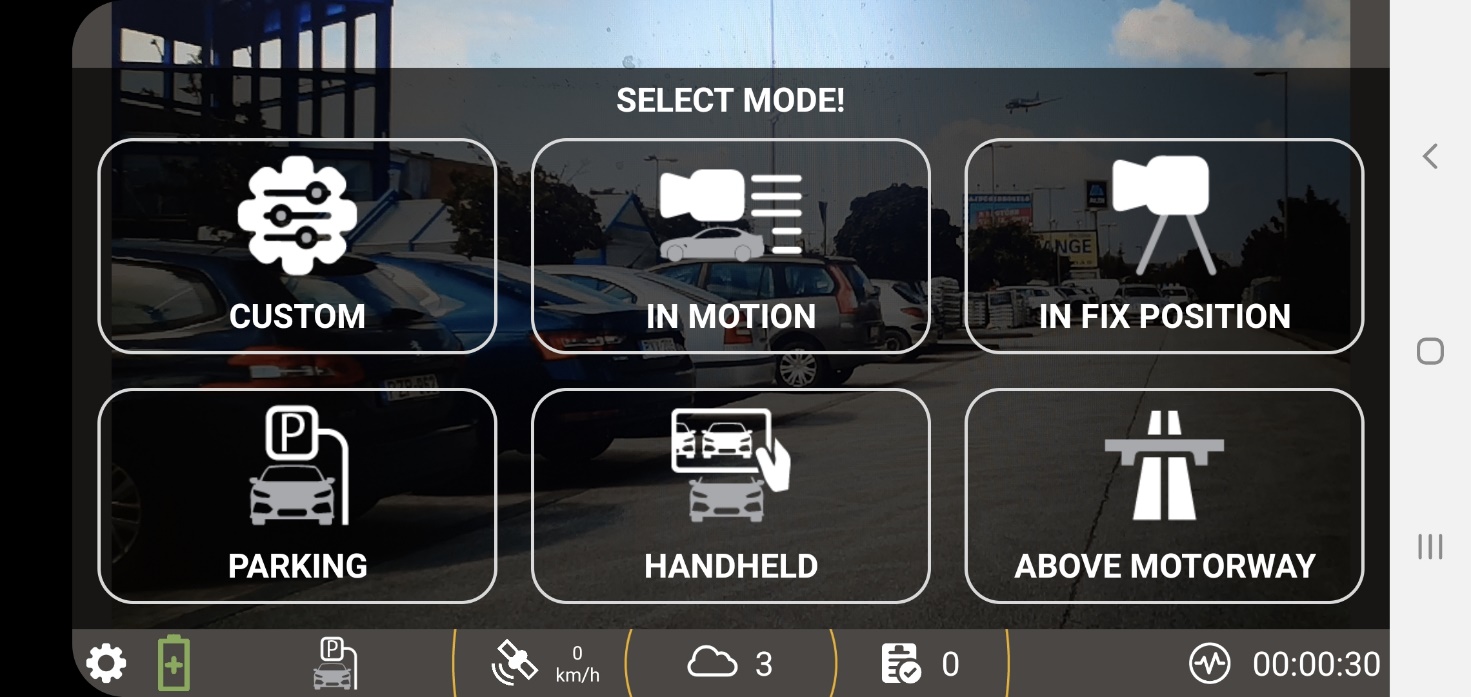
When you select ANPR camera stream mode, you can find six pre-sets with appropriate settings for the relevant use cases.
Custom Mode
Here you can load the previously saved personalized settings configuration. During ANPR camera stream processing, you can click the settings icon (bottom left corner) to make finetuning adjustments and clicking the save button will create a custom settings configuration.
For example, let's say you finetune the camera configuration while using parking mode and decide to save the settings at hand for future use, you no longer need to finetune again as you can simply choose the CUSTOM mode from now on and the pre-finetuned settings will always be ready to be used!
In Motion
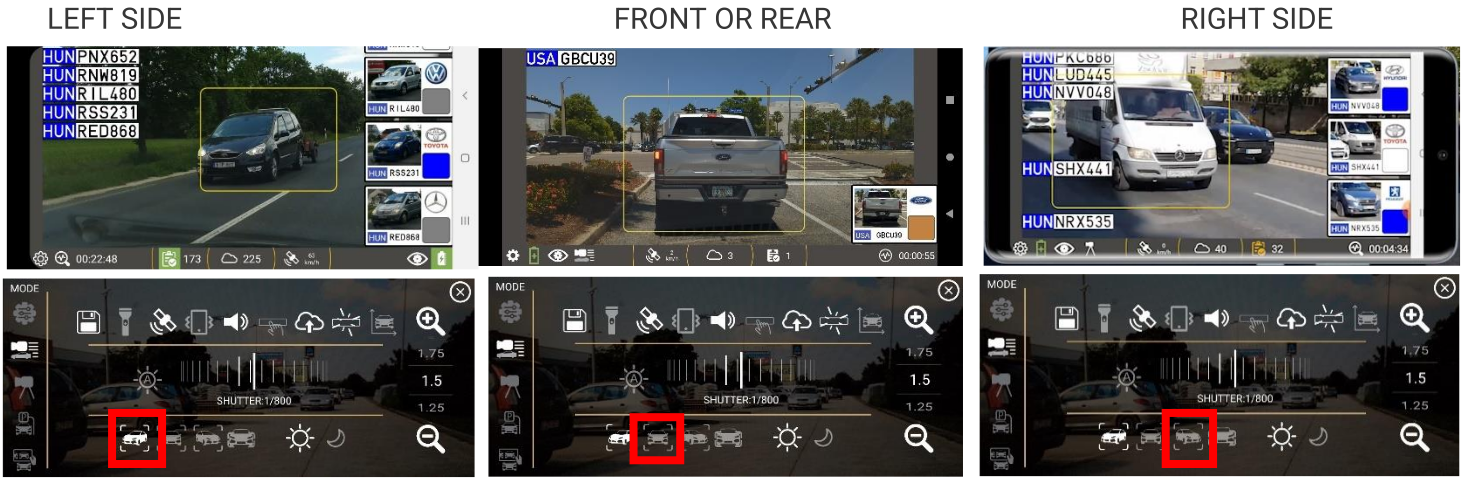
This mode is for mobile monitoring when the device is in motion. We suggest installing your device using a phone mount safely inside the vehicle. The camera should be positioned towards target vehicles, panned to the left or right (e.g. 20-40 degrees away from the direction of travel) or centered as appropriate – see examples below.
Please be sure, that you select the proper target vehicle direction mode in the settings menu.
In Fix Position Mode
Use this mode to monitor traffic from a stationary position. For example, from a parked car or a roadside tripod.
Parking Mode
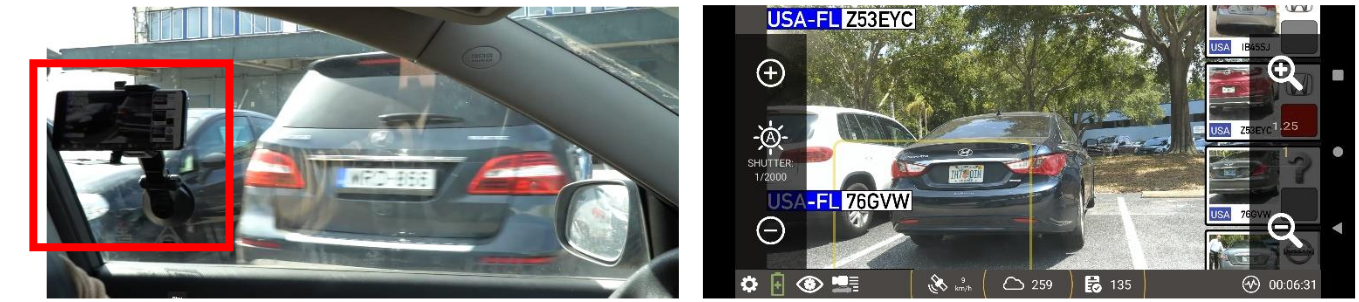
This mode is for capturing parked cars, so position the camera perpendicular to the number plates of the vehicles. For best results make sure the number plates appear as horizontal as possible and that the vehicle is not too small or not too large on the screen – see example below.
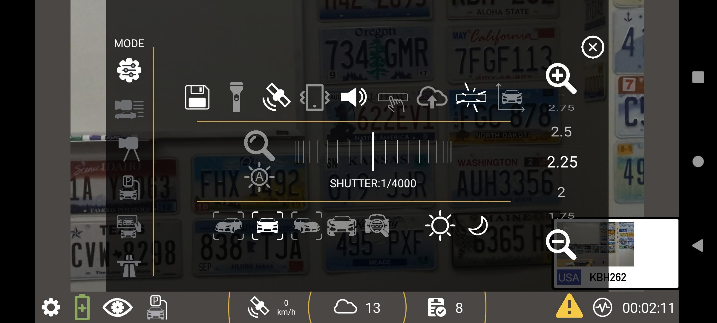
Under the settings tab you can find vehicle size icon, which will show you the minimum and maximum vehicle size that can be detected from your device.
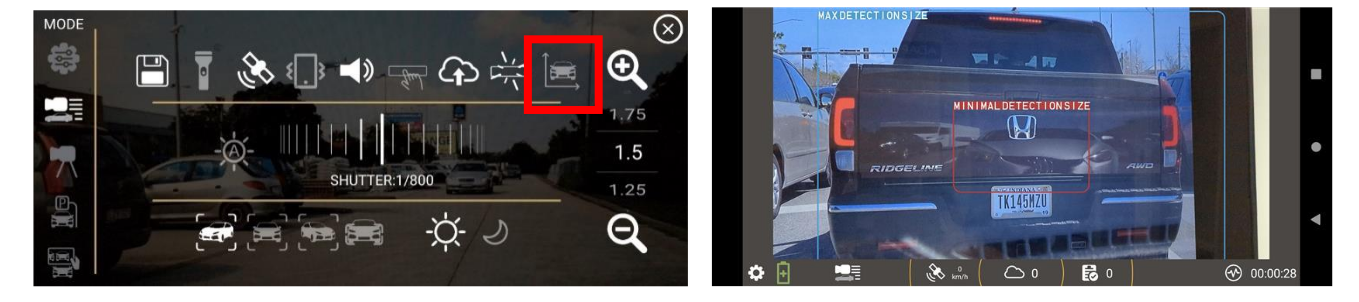
The sample image below shows optimal vehicle size and yellow frame shows the detected vehicles:
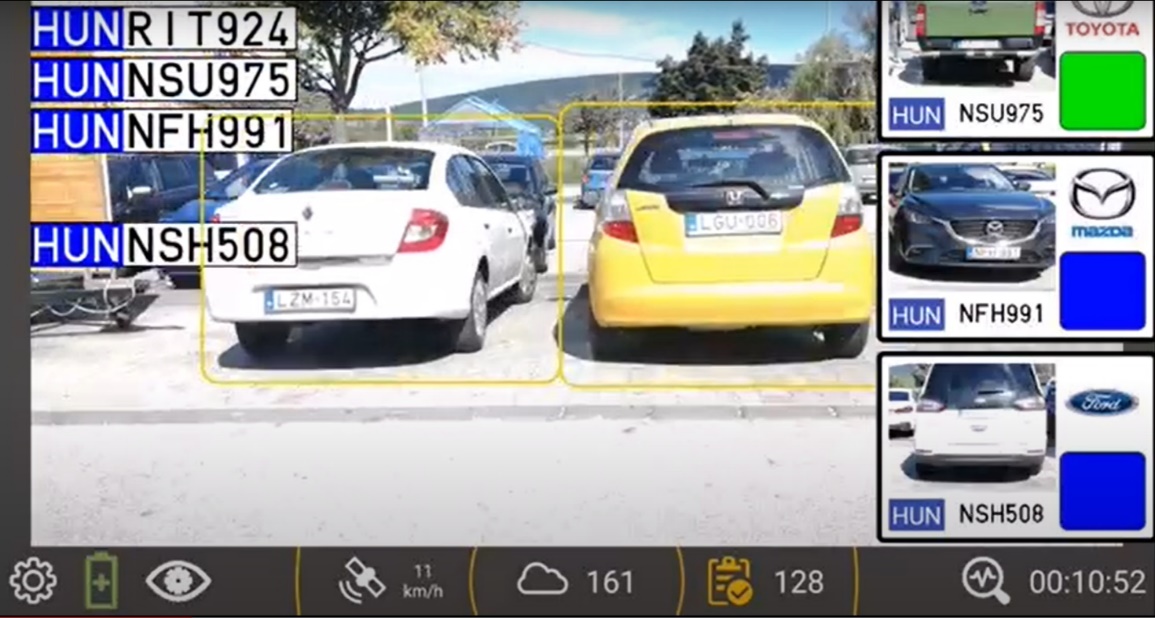
Shutter time is set automatically to 1/800. In practice, this means you should not drive faster than 40 km/h (25mph) for the best results.
Handheld Mode
Use this mode for manual triggering. By clicking the manual trigger button (middle of the screen), you will capture an image for processing. Make sure you hold the phone still, as this mode selects the device’s automatic shutter which does not guarantee sharp images. This mode is “handy” for walking or parking officers.
Above Motorway Mode
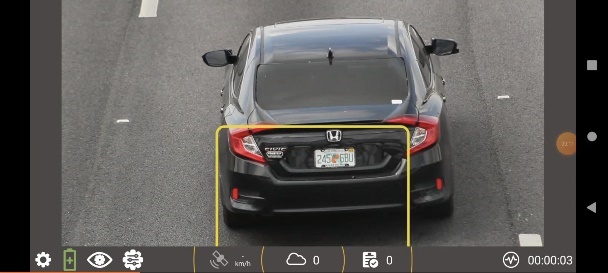
Use this mode for overhead monitoring on a highway. Make sure to set an appropriate zoom to have triggers. It is recommended to set up the application and camera in such a way that the camera can scan two lanes. Here is an example of an optimal zoom. You will receive results for every visible / legible number plate within the camera view, even if you have two vehicles passing by simultaneously.
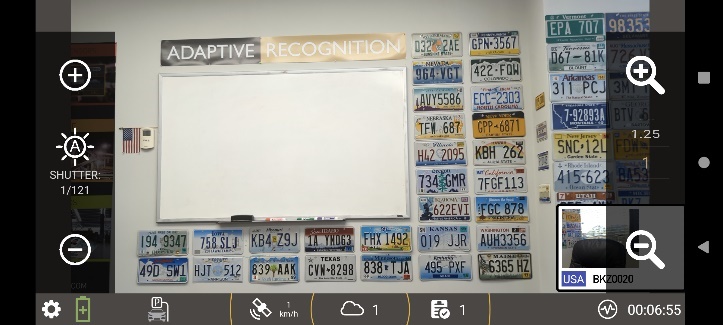
Status Bar
When you enter the video processing mode you will see a status bar – see explanation below:
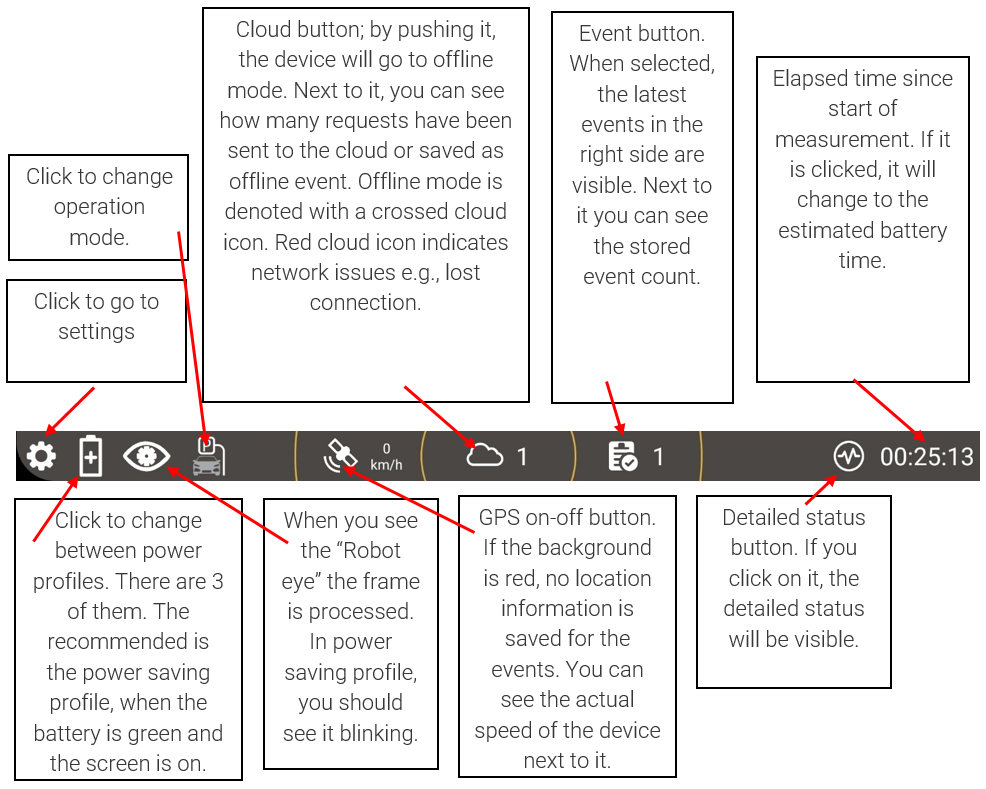
White color indicates on/selected state, while grey means that the function is not active/off.
Video Settings
By clicking on the settings button, the following menu will be visible.
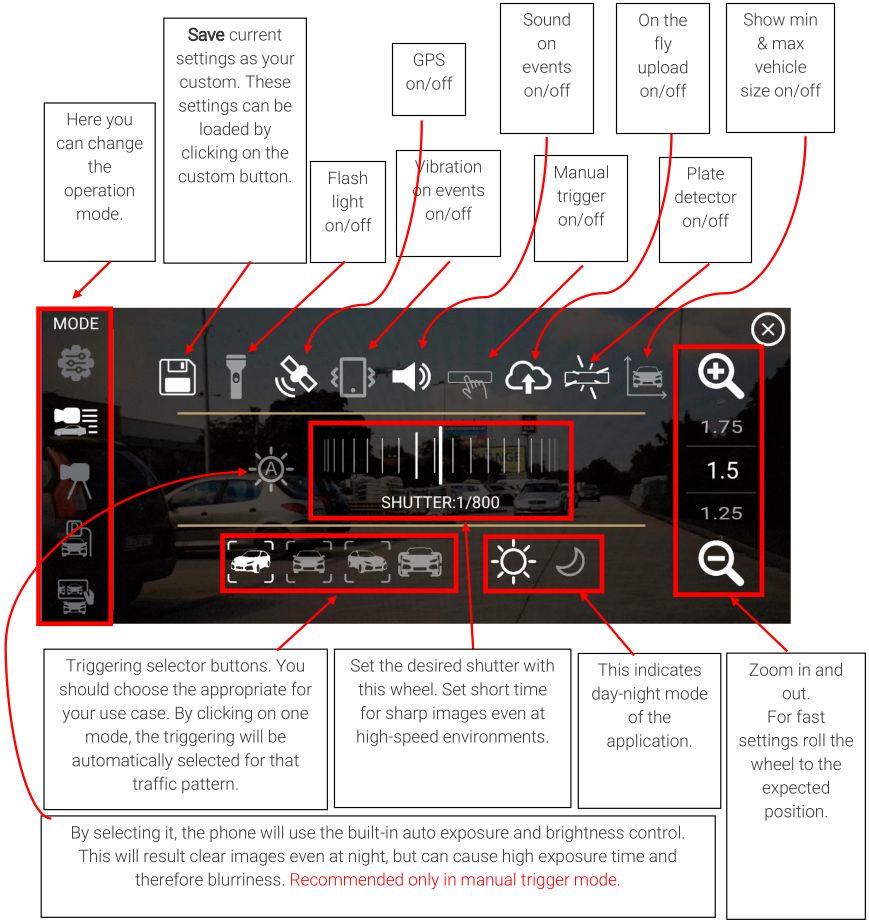
ANPR Local MP4

This input mode lets you select an mp4 video and process it in the same way as a camera live stream. This feature works well for demo purposes.
ANPR External Stream

This mode lets you process video stream from an external camera by entering or scanning the media URL. Supported formats: MJPEG, RTSP, RTMP
Carmen® Mobile application cannot change the shutter and camera parameters of an external stream, so make sure that the plates on the input stream are readable and not blurred.
ANPR On Screen

This mode allows you to process any video displayed on your device’s screen. This option lets you integrate ANPR & MMR into any kind of external stream that has a live view. Here are some examples:
- on any YouTube video.
- on DJI Drone live view.
- on external action camera’s live view such as GoPro.
When the screen recording has started, a floating layout will appear in the top right corner of the phone.
For best results turn your phone in the desired orientation. Changing the orientation might cause efficiency loss on certain devices.
Carmen® Mobile application cannot change the shutter and other camera parameters of the external stream. Make sure that the plates on the processed stream is not blurred and readable.
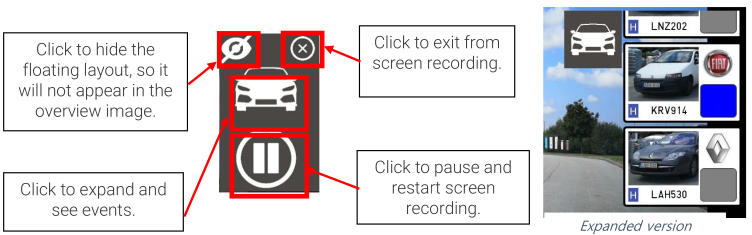
The app will process the whole screen (even the floating and the expanded layout if it is visible).
ANPR Single Image

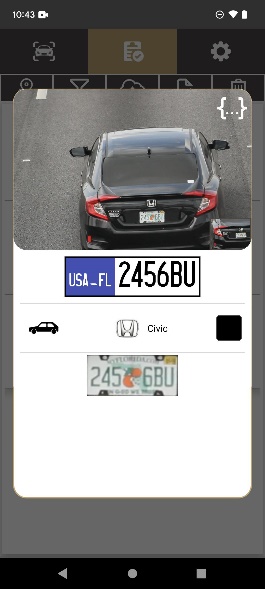
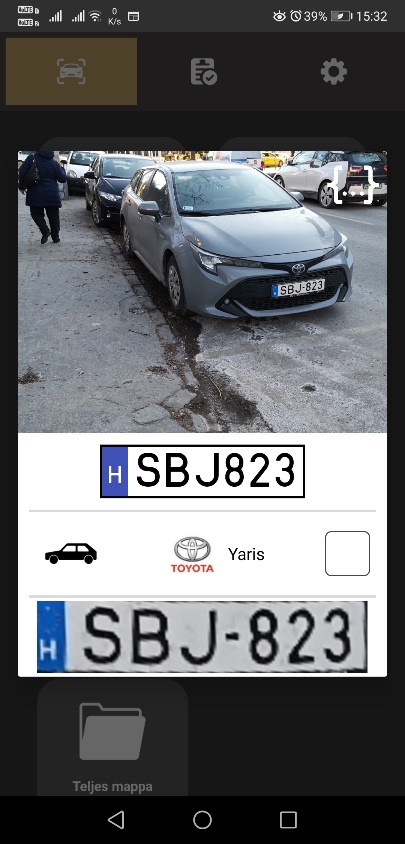
Under this mode you can select an image from your device’s memory and process it. The result will pop up immediately like the attached image.
ANPR Image Taken

You can take a photo even by using the native photo app and process that image. The result will pop up in a dialog like the attached image.
ANPR Images In Folder

This mode allows you to process a folder containing images. The app will upload every image to the Carmen® ANPR Cloud for automatic recognition. The results will appear in the list of events. Be sure that the plate orientation is correct such as landscape or portrait.
Events
The application creates event from the video stream, and stores it on the phone’s SD card on a local database. To view the recorded events, please click the “Events” tab. A list of the events will be visible. A list item contains the following data; Image, plate and nationality, make, model and color of the vehicle, and the timestamp of the event. By clicking on an event, you can see the detailed info about the event (image, overview image, location, ANPR & MMR results, and the cropped plate image).
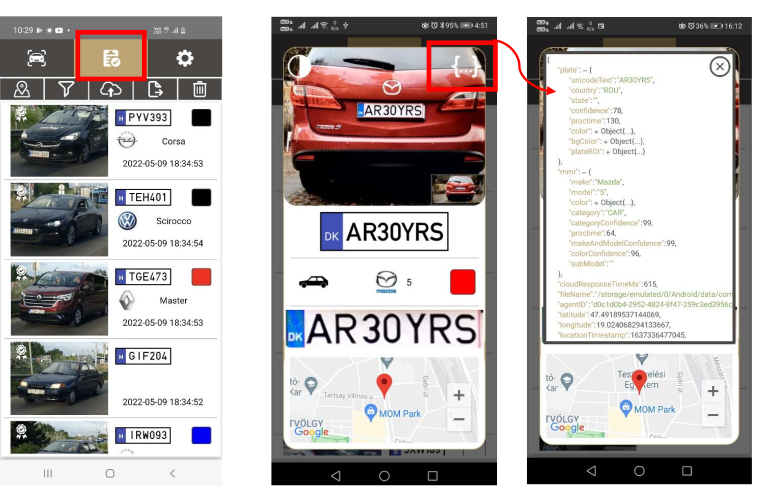
You can even scroll through each event by sliding right and left on the screen or delete a single event by holding down on an event.
Event Options
MAP Mode

Clicking on the map button a map will appear with the events. The events are clustered. By zooming in the clusters are separated and you can see the individual events with its GPS location. By clicking on a marker, you can see the event details and metadata.
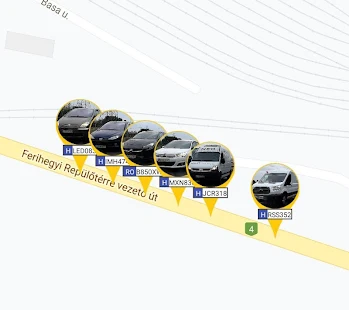
Filters

You can search and run analysis on your recorded events. When you open the filters dialog you can select the filters. By selecting multiple filters or analysis, the application will select the events that matches all the filters. For example, if you choose Today and Denied filters, the application will filter all events that are on your customized deny list and recorded on the day of the search.
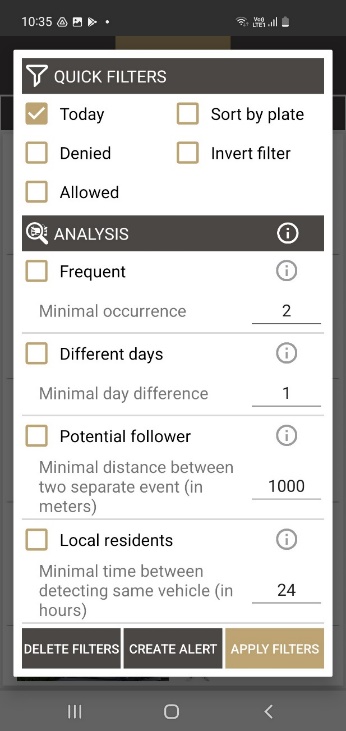
You can create an alert from your custom filter. If an event matches your filter alert, the application will make a visual alert immediately.
You can manage your alerts in the Settings / Hotlists & Alerts menu. For details see 2.3 of this document.
You can export, delete and even view your selection on Google Maps.
A detailed example of a filter can be found in the appendix.
Upload

Click the upload icon to upload the events to a back-office system. You can follow the progress of the upload in a progress bar. Details of event upload can be found in the 5.1 section of this document.
It is not recommended to touch the phone while uploading, as it will stop the upload procedure.
Export

By clicking on the export icon, you can export your database and event data as a CSV or as a ZIP file. After the export is finished, you can share or open the export result.
Delete

Click the delete button to clear the database. The application will remove all metadata and media as well. You can set up your delete rules in the settings menu. If you select the “apply rules” button, only those events will be deleted that matches your rules.
Do not stop the delete operation until it is finished.
Integration
Upload
Uploading to GDS (additional software product from Adaptive Recognition)
If you don’t have it, please contact the sales department via our webpage: https://adaptiverecognition.com/general-contact/
When you successfully registered your application to the GDS server, the GDS administrator has to approve your registration. Uploading events to GDS is possible only after approval!
It is recommended to upload your data after finishing the measurement preferably on Wi-Fi connection for the following reasons:
- As sending images to GDS also uses your 4g connection and it might slow down the response time of the Carmen® ANPR Cloud service and it may cause some timeouts when driving in low 4g gradient area.
- Uploading the overview image on 4g connection is not recommended at all, because an event can be even 2 Mb!! When connected to Wi-Fi, this is not a problem and you can show all the data that is generated by the app, on the GDS.
It is not recommended to touch the phone while uploading, as it will stop the upload procedure.
Other Upload Methods
Besides uploading to GDS server, you have two other options.
- Upload the events and metadata to an FTP server. For this usage you have to scan a valid FTP link, like the following as a QR-code.
This is an example of a valid link:
ftp://user:password@192.168.1.100:21/By pushing the upload button, the events (images and metadata) will be uploaded to this server. (If your user or password has special character like
@, you have to url encode it.)Instead:
ftp://USER:P@$$WORD@192.168.1.100:21/you should write:ftp://USER:P%40%24%24WORD@192.168.1.100:21/
- HTTP POST: The application can call a REST API. It will send the images and metadata in a multipart HTTP post message. This is an easy to integrate option.
On-the-fly Upload
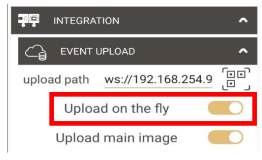
By selecting “Upload on the fly” option, the application will upload the events immediately after recording them. This is not a recommended feature unless you have a strong 4g connection.
Advanced settings
Features
Make and Model Recognition (MMR)
This is selected by default. You may disable if you are not interested in the make and model of the vehicle. MMR in the Carmen® ANPR Cloud is a free add-on.
Use Custom Settings
Enable this to enter the custom mode automatically. After starting the camera stream processing, you do not have to select any pre-sets.
Overview Image
By selecting this option, the app will save overview images to the events.
MP4
By selecting this option, the app will save a short video for each event. This feature requires 8 core CPU, as composing the video is a processor intensive task.
Save Metadata
Select this to save the metadata as JSON to the phone’s SD card. This can be a way of integration.
Optimizations
Power Safe Mode
Power safe mode means that the app does not process all images of the stream, as it is highly processor intensive, and drains the battery much faster. In this mode the app skips certain images, but it tries to catch all events. At high speed or heavy traffic fewer images are skipped.
Off-line Processing
By enabling this option, the app will collect events on the local SD card, but will not upload them to the Carmen® ANPR Cloud. Therefore, you are not bound to network traffic. The app can upload the events at a later time on Wi-Fi connection.
Grayscale Processing
Use this option if colored image is not important for you or automatically the device will switch to this mode temporary if the device’s processor is overheated (safe mode). Working with grayscale images under the hood is far less processor intensive, and therefore the app can run on mid end smartphones as well.
Delete
Delete Uploaded Events
Use this option when you would like to delete uploaded events. This will allow you device to free up space as you are collecting events.
Delete after TTL (Time to live in days) passes
Use this option to set up a limit on how many days an event can be stored on the application.
Delete when max event count reached
Use this option to set up a limit on how many events can be stored on your phone at once. Once it reaches the limit, the application will begin to delete the oldest event stored.
Security
The app can digitally sign the image and the metadata, so it can be verified in server side that a certain user has created the event, and the event data was not tampered with. The supported options are, signing event metadata and/or event image. For enabling this option, you have to scan a private (signing) key. This can be generated with openssl program with the following command.
openssl genrsa -out rsa_2048_priv.pem 2048
Generate a QR code from the private key and scan it with the application. The application will automatically sign the metadata and image after event creation.
Media and Streams
You can scan a media path (RTSP, RTMP, MJPEG). When selecting the “ANPR external stream” function, the phone will process the configured stream. By enabling GPS for external streams, the application will save the phone’s GPS coordinate for the event. This is recommended only while travelling with the stream source, such as an action camera.
Alerts & Hotlist
Hotlists (Deny & Allow) Lists
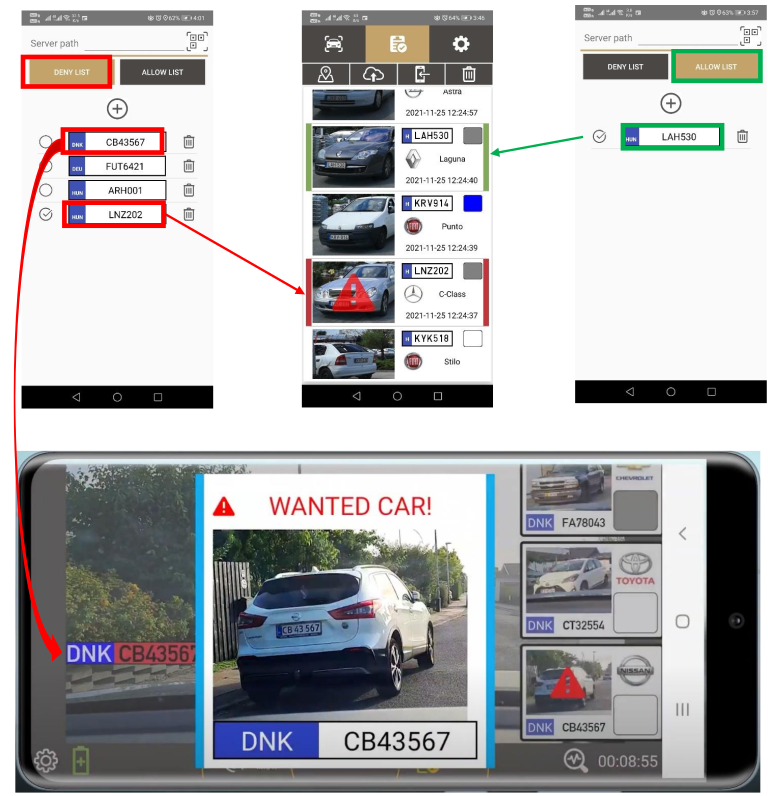
You can configure your hotlists in the app and get instant alerts on events. You have two types of hotlists, deny and allow list. Events on deny list will generate visual alerts while processing your camera stream. In case an event matches your allow list, it gets green alert signs. Events on hotlist also outlined in the event list view.
E-Mail Settings
You can set up an SMTP server and an e-mail address in the application. In case your e-mail setup matches an alert, the application will automatically send an e-mail to the configured address.
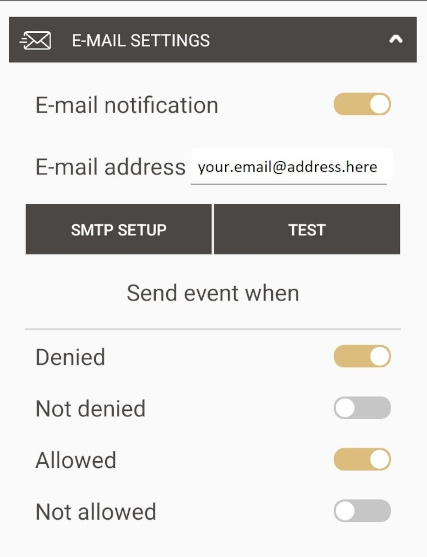
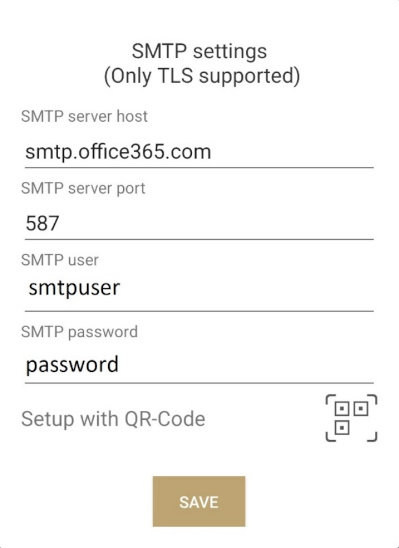
To setup your SMTP server, please click on the SMTP SETUP button. A dialog will be visible for you where you can give the details of your SMTP settings.
For easy setup on multiple devices, please create a QR-code, and scan it with the application. Here is a template of a JSON text that has to be encoded and the generated QR-code.
{
    "hostname":"smtp.gmail.com",
    "port":587,
    "user":"user@gmail.com",
    "password":"mysectetpassword"
}

After a successful setup you can click on the TEST button to test if the application is able to send the e-mail to the user. If a test e-mail arrives than the settings are fine.
This feature is tested with Gmail & Office365.
When e-mail alert is activated for an event, you will receive an e-mail with the following basic details:
plate, country, timestamp, gps coordinate as a GoogleMaps link, image, and the cause of the alert.
Alerts
You can configure and manage your alerts in this menu. Click on the Plus icon to create a new alert. You can select multiple filter options and analysis and click on the Save button to create one. Now you have to give a name for your alert. After creating one, you can manage by clicking the icons for your alerts. When the alert happens, the given name will be visible at the top of the alert window.
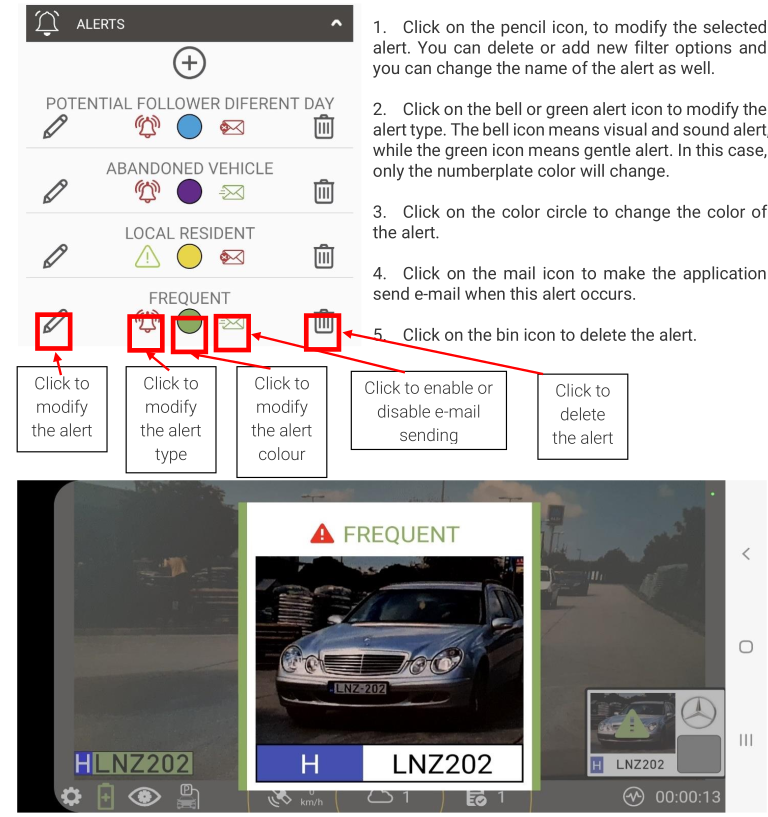
Deny listed events will automatically create visual alert, while events on allow list generates gentle alerts.
Tips and Best Practices
- Always activate make and model recognition. (Selected by default.)
- Save overview image only if you have enough space. The average size of one event with overview image is around 1,5Mb.
- Use the energy efficient mode.
- The application runs best, under good light conditions.
- Upload the events when connected to Wi-Fi.
- Make sure the plate looks as horizontal as possible. (The plate finder is sensitive to it.)
- If the manual trigger is activated, the automatic trigger is switched off.
- The analytics runs only on frames marked with the “robot eye” in the status bar.
- You can activate offline data processing. This means, that the app will collect images and metadata on the phone, and will not use 4g. You can process and upload the events at a later time on Wi-Fi connection.
- You can integrate the camera stream processing into existing solutions, and the app can send the data back to the caller application’s background service. Read the integration manual for details.
- You can connect the app to external streams, by scanning the stream path as a QR-code, and pushing the “anpr for external stream” button in the ANPR tab.
- You can select an mp4 video and run the analytics on it.
- The app can digitally sign the image and the metadata, so it can be verified in server side that a certain user has created the event, and the event data was not tampered with.
Checklist Before Measurement
- Remove any case or protector from the phone, which can cause overheating.
- Make sure you have enough free space for events on the phone.
- Enable GPS before starting the camera stream processing.
- Enable mobile Internet connection.
- Make sure that the plates are as horizontal as possible in the image.
- Do not change any settings unless it is necessary. Select a mode, the automatic settings will do the rest.